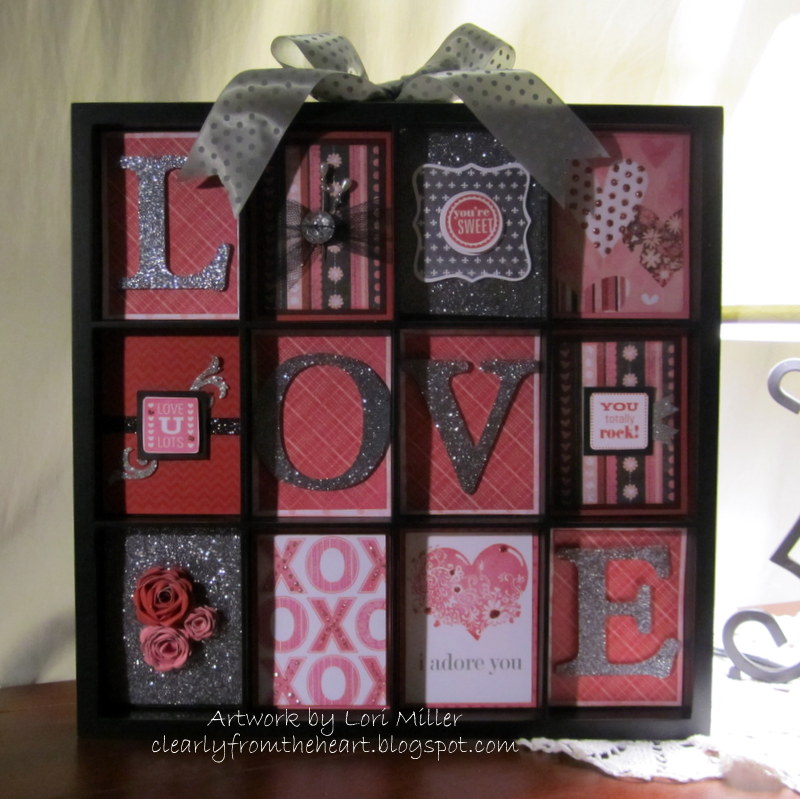
Thanks for counting down with me! Here is my grand finale - the display tray. I apologize for the quality (or lack thereof!) of the picture. It's late, and the lighting is not great.
I used a variety of papers and stamp sets. I tried to add a little bling to every section. My secret with this board? I fastened each section in using our little hook and loop circles! I will be able to switch out the sections each season. Happy Valentine's Day!
Showing posts with label Art Philosophy. Show all posts
Thursday, February 14, 2013
Thursday, May 24, 2012
One stamp = Beautiful!
I am wild about our A-size stamp sets, especially the beautiful single stamps. The stamps are a great bargain at $6.95 each, and you can do so much with them! Watch this video for some great ideas.
Monday, April 16, 2012
Dotty for You Blog Hop
We're going Dotty with a fun blog hop! Join me to see fun, creative projects made using the Dotty for You papers. The hop is a circular hop, so you can start anywhere. If you arrived here from Judy Faye Garner's blog, you're on the right path! The link to the next blog will be at the end of my post. Enjoy!
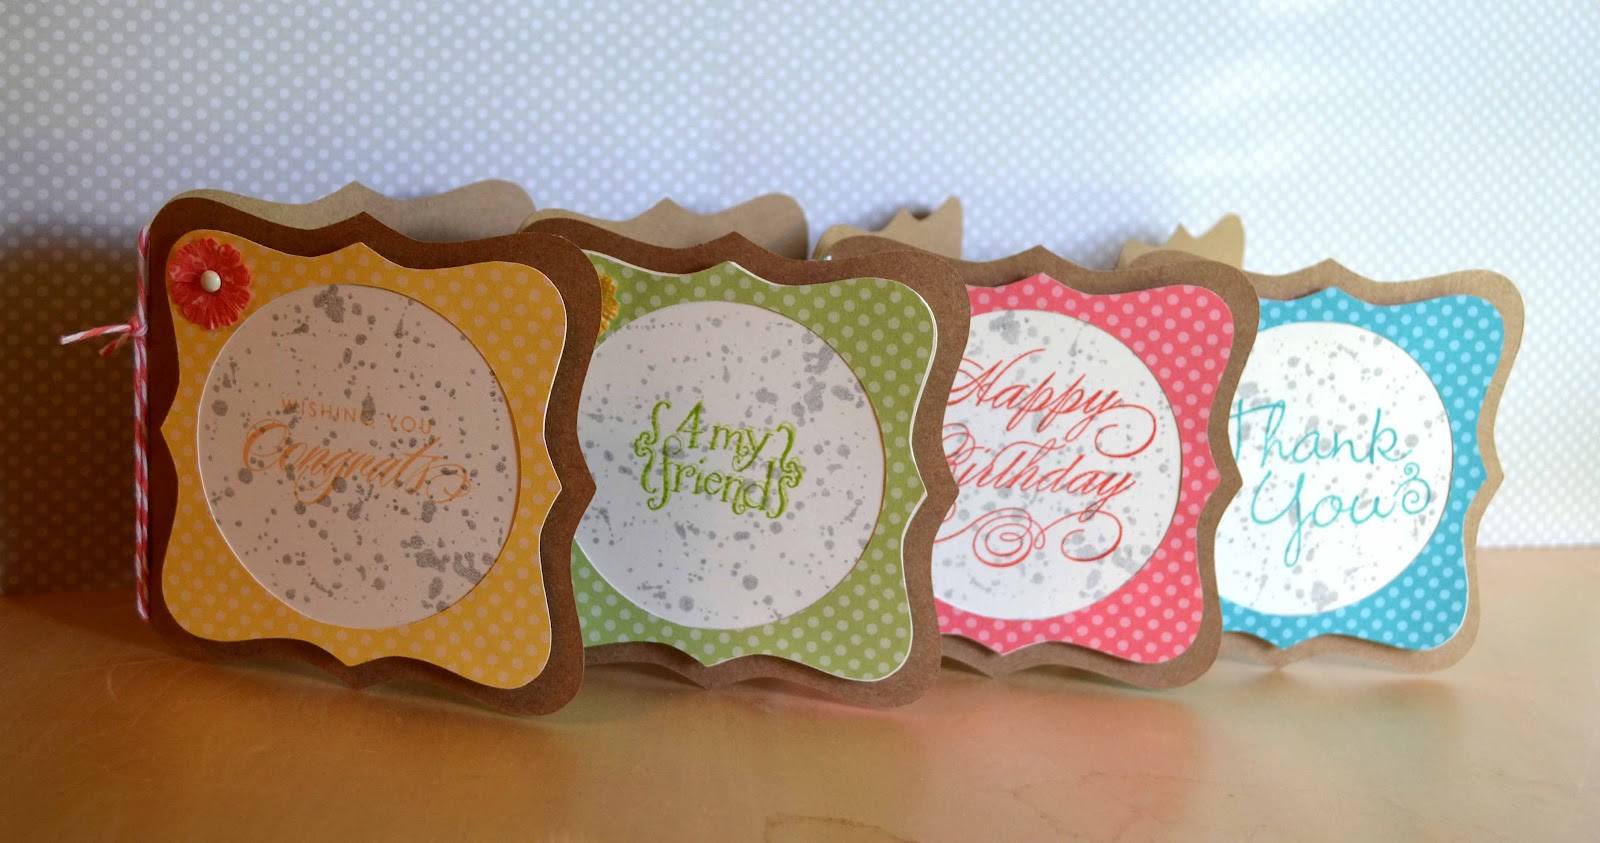
The Dotty for You paper packet has 12 different patterns (2 sheets of each pattern), PLUS the reverse side is dotted paper in different colors! Fun! I used the dotted side to make this little quartet of cards. I cut the cards using Art Philosophy and kraft cardstock. (Card -
To make things even more fun, I also made matching envelopes (Font layer - Shift -
To make the cards, you will use the following items:
Papers: Dotty for You, Kraft and Colonial White cardstock
Stamp sets: 4 My Friend, Diverse Backgrounds
Embellishments: Just Blooms Paper Shapes - Paradise, Baker's Twine Paradise Assortment, Brads Basic Assortment
Other: Art Philosophy, 3-D foam tape
Now hop on over to Michelle Loncar's blog to see her cute project! If you get stopped along the way, click here for a complete list of hoppers.
Tuesday, March 6, 2012
I'm lovin' Lucy!
This sweet paper packet is perfect for a birthday card for someone special. I love the soft colors in "Lucy!" When I saw this week's Mojo Monday sketch, I immediately pictured a flower pot on the front of the card. Love how it turned out!
Cut off the bow at the top - instant flower pot! I used the gray wool marker to shade it just a little because it looked too flat.
The flowers are the Paradise Paper Flowers, and the leaves were cut using Art Philosophy. I attached them to a small piece of cardstock so a little message could be pulled out like this from the flower pot that is raised a little using 3-D foam tape --
Can you guess which shape on the Cricut Art Philosophy cartridge I used to make the flower pot? I adapted the present by making a few small adjustments! First, measure in 1/2" from each side and draw a line up to then part that extends slightly at the top. Cut along each line.
Cut off the bow at the top - instant flower pot! I used the gray wool marker to shade it just a little because it looked too flat.
The flowers are the Paradise Paper Flowers, and the leaves were cut using Art Philosophy. I attached them to a small piece of cardstock so a little message could be pulled out like this from the flower pot that is raised a little using 3-D foam tape --
The center of the flower is CTMH baker's twine, coiled on a glue dot. After taking these pictures, I decided the center needed a little adhesive pearl.
Of course, the inside needs to be pretty, too!
The sentiment was double-stamped: first, in first generation Cotton Candy ink, then in second generation Gray Wool, slightly offset to give the illusion of a shadow. I love the look!
Thursday, February 23, 2012
Embrace the Philosophy of Fun in March!
I'd love to have you join my team! Feel free to call or e-mail with questions. (309-826-6705 or clearlyfromtheheart@gmail.com) You can also check out the Join My Team! page on this blog or watch the video for more information.
Thursday, February 9, 2012
LOVE
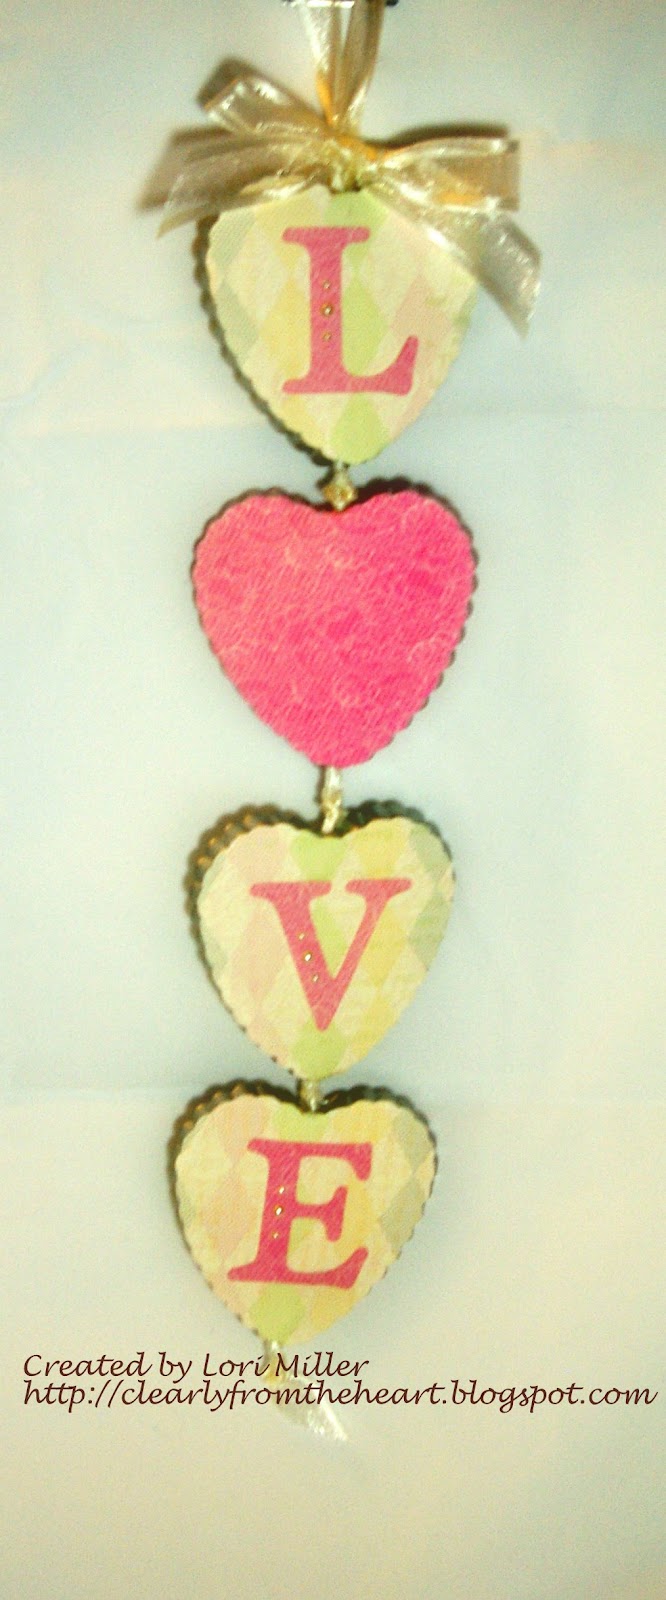
The challenge at Heart 2 Heart this week is to make something for the one you love. I've had these heart-shaped large bottle caps for quite a while and decided to use them to make a little wall hanging for over my kitchen sink. I love how it turned out!
It was very easy to make. I traced the heart shape onto a scrap piece of cardstock and cut out a template. Then it was easy to trace the pattern on the back of the lovely Lucy B&T paper and adhere the paper to the hearts. The letters were cut using Art Philosophy (of course!) and embellished with little pearls. So sweet and simple!
Products used:
Paper: Lucy Level 2 Paper Packet
Embellishments: Opaques Pearl Adhesive Gems, Colonial White ribbon
Other: Cricut Art Philosphy, heart bottle caps, Cropadile
Thursday, December 8, 2011
Wonderland Stocking Card
I love it when a card just kind of makes itself. This one came together so easily! I was inspired by this post found on Pinterest. My bff (also known as the Art Philosophy cartridge) helped out, too, by cutting the stocking (3 1/2") and the snowflake (1 1/4").
Here's a peek at the inside:
You can find the items to make the card on my website.
Items used:
Paper: Wonderland Level 2 Paper Packet; Kraft cardstock; Twilight cardstock
Ink: Chocolate
Embellishments: Neutral Embroidery Floss; Chocolate Waxy Flax; Chocolate Striped Grosgrain Ribbon; Bling Assortment
Other: Ruler; Paper Piercing Kit; Stardust Glitz Glitter Glue; 3-D Foam Tape; Liquid Glass; Art Philosophy
Wednesday, December 7, 2011
Believe Christmas Card
I'm so excited to be able to make some new cards and projects! This card is for two challenges - Mojo Monday (sketch) and Heart 2 Heart (inspiration photo). The oval image was cut using Art Philosophy. I love that cartridge! So many of our stamp images are designed to coordinate with the images on the Cricut cartridge. Super easy!
Items Used:
Believe Level 2 Paper Packet
Art Philosophy
Cardstock/Ink: White Daisy, Holiday Red, Topiary, Sweet Leaf, Gray Wool
D1492 - Christmas Love
C1469 - December 25th
S1110 - Holiday Magic
Sweet Leaf Stitched Grosgrain Ribbon
Designer Brads - Rhinestone
Bitty Sparkles
3-D Foam Tape
Here is the sketch and inspiration photo for the card:
O Christmas Tree
Have you joined the Pinterest craze yet? I find so many ideas on there! The project I worked on today was inspired by this idea that I saw on Pinterest. She used nesting templates and a die cut machine; I decided to use the Cricut Art Philosophy cartridge to cut my images. I thought it was much easier!
To start, I selected six different papers (2 pieces of each) in Christmas colors. (See the last of my stash of Cocoa Cafe papers?) I think all my papers are retired from previous catalogs. This is a great project to use them up!
I cut the scalloped circle 11 times on each paper, starting with 1" and increasing to 6" by 1/2-inch increments. I ended up with enough to make two trees.
Next came the fun part - making the tree! Starting with the largest (6") circle, I stacked three of each size all the way to the top of the dowel rod. To give the pieces a little separation, I tied a piece of grosgrain ribbon between each of the larger pieces (3" - 6"), then I switched to organdy ribbon for the smaller pieces since they could be a little closer together.
I topped my tree off with a 2" two-sided star, also cut on the Cricut. Be sure to check out the other Art Philosophy Cricut creations on the linky party hosted by Lisa Stenz! You can find complete directions for the linky party {here}.
To start, I selected six different papers (2 pieces of each) in Christmas colors. (See the last of my stash of Cocoa Cafe papers?) I think all my papers are retired from previous catalogs. This is a great project to use them up!
I cut the scalloped circle 11 times on each paper, starting with 1" and increasing to 6" by 1/2-inch increments. I ended up with enough to make two trees.
When I had all my pieces cut, I sorted them by size and inked the edges with Cocoa ink.
The base of the tree is pretty simple - a 12" dowel rod and a cardboard base. I used part of a CTMH mailing box for my base. It didn't seem sturdy enough, so I reinforced it with some, let's say, creative items.
Hey - it worked!
Next came the fun part - making the tree! Starting with the largest (6") circle, I stacked three of each size all the way to the top of the dowel rod. To give the pieces a little separation, I tied a piece of grosgrain ribbon between each of the larger pieces (3" - 6"), then I switched to organdy ribbon for the smaller pieces since they could be a little closer together.
I topped my tree off with a 2" two-sided star, also cut on the Cricut. Be sure to check out the other Art Philosophy Cricut creations on the linky party hosted by Lisa Stenz! You can find complete directions for the linky party {here}.
Thursday, December 1, 2011
Christmas Tags
Making tags is so quick and easy with the Cricut Art Philosophy cartridge! The video below shows you how --
Sunday, November 6, 2011
Elemental 6x6 Kraft Card
A few weeks ago, I was priveleged to attend the CTMH Regional Celebration near Detroit. One of the fun activities was a swap. The swap items had to be made using the 6 x 6 Kraft Cards, one of my very favorite items in the Autumn/Winter Idea Book! The cards all come with a matching envelope, and each card has a sweet scalloped flap, which I decided to fold down on my card. The card pictured here is my contribution to the swap. The envelope was so easy to line. I cut a piece of coordinating B&T 1/2" smaller than the envelope. I traced the slope of the envelope flap and trimmed it off, then slid the liner inside. Tip: Only adhere the flap of the liner, allowing the bottom part to "slide" a little as the flap opens and closes.
Here's a peek at the inside:
Items used:
- Art Philosophy
- Elemental Level 2 Paper Packet
- C1473 - Remarkable Wreath
- Kraft Cards & Envelopes
- Inks: Cocoa, Sorbet, Creme Brulee, Cranberry, Desert Sand
- Cardstock: Pacifica, Colonial White
- Embellishments: Embroidery Floss - Neutral; Chocolate Striped Ribbon; Wooden Designer Buttons; Chocolate Waxy Flax; Opaques - Mocha
- Tools: Scissors; Piercing Tool; Distressing Kit
- Other: Alene's Quick Dry Glue
Sunday, September 18, 2011
Typeset Level 2 Layout - It's a Winner!!
I was going to wait until this was posted on the CTMH Make It From the Heart Art Gallery, but I can't wait! All the winning entries will be posted later this week, but for now -- here's my winning layout! The category is Typeset - Level 2 Layout. No stamping was allowed, just paper, cardstock, ink and embellishments. I realized that these pictures of my boys on an airplane were exactly right for this paper.
Here is a closer view of the left page. The main picture is given some dimension using foam tape. The Milepost Shapes were distressed using the stipple brush and Cocoa re-inker as were the edges of the cardstock and B&T. Isn't the paper airplane cute? It is one of the new Complements (Typeset Canvas Complements).
And a closer view of the right page:
The journaling block is also from the Typeset Canvas Complements. I wrote directly on it using a My Legacy writer, and it worked really well. To make things more fun, I decided to make my page interactive. The arrows swing away so the Flip Flaps can open to reveal the photos on the other side.
I had so much fun making this layout and am so excited to have won! If you'd like to make a similar layout, the recipe is below. All items are available on my website (lorimiller.myctmh.com) or www.ctmh.com/lorimiller (after October 1). Thanks for sharing my excitement!
Items used:
- Magic - Out of the Hat (p. 82 - 83)
- Paper - Typeset Level 2 Paper Packet
- Ink - Cocoa Re-inker
- Embellishments - Milepost Shapes; Wooden Designer Buttons; Typeset Complements Canvas Shapes; Neutral Assortment Embroidery Floss; Natural Hemp; Metal Assortment Brads
- Other - Cricut Art Philosophy; Flip Flaps; My Legacy Writers; Ruler; Piercing Tool Kit; Distressing Kit; 3-D Foam Tape
A Wicked Card
With the release of every new Idea Book, CTMH holds a contest for consultants to create cards, scrapbook pages, and altered items using new products in the Idea Book. The winners have their artwork posted on the Corporate Make It From Your Heart Art Gallery. I submitted a card featuring the August Stamp of the Month, "Wicked." It didn't win, but I'm still pretty proud of it and want to share it with you. My hope is that this will inspire you to pull out your "Wicked" stamp set and start creating! :)
I used one of my favorite products - a clear card. Clear cards are easy to use but require a bit of planning to hide the adhesive. Think of the layers as a sandwich with the acrylic piece in the middle. For instance, on the front of my card, I attached the Colonial White half-circle (with the hat) to the top of the card, then I opened the card and put adhesive on the back of the acrylic (back side of the card front). Then I carefully lined up the black half-circle and pressed it together. I did the same with the back piece -- the smaller circle was attached to the top of the back (clear as mud, right?!), then the larger circle was attached to the back, hiding the adhesive.
I'm including some close-ups of the rose on the front, made using the Art Philosophy Cricut cartridge. I {heart} those roses!
Items used:
Stamps: Wicked
Paper: Mischief; Colonial White cardstock; Black cardstock; Sunset cardstock
Ink: Black; Sunset
Accessories: Cricut Art Philosophy; 4 1/2" Assortment Clear Cards; Licorice Opaques Adhesive Gems
Thursday, September 1, 2011
Typeset Workshop on the Go
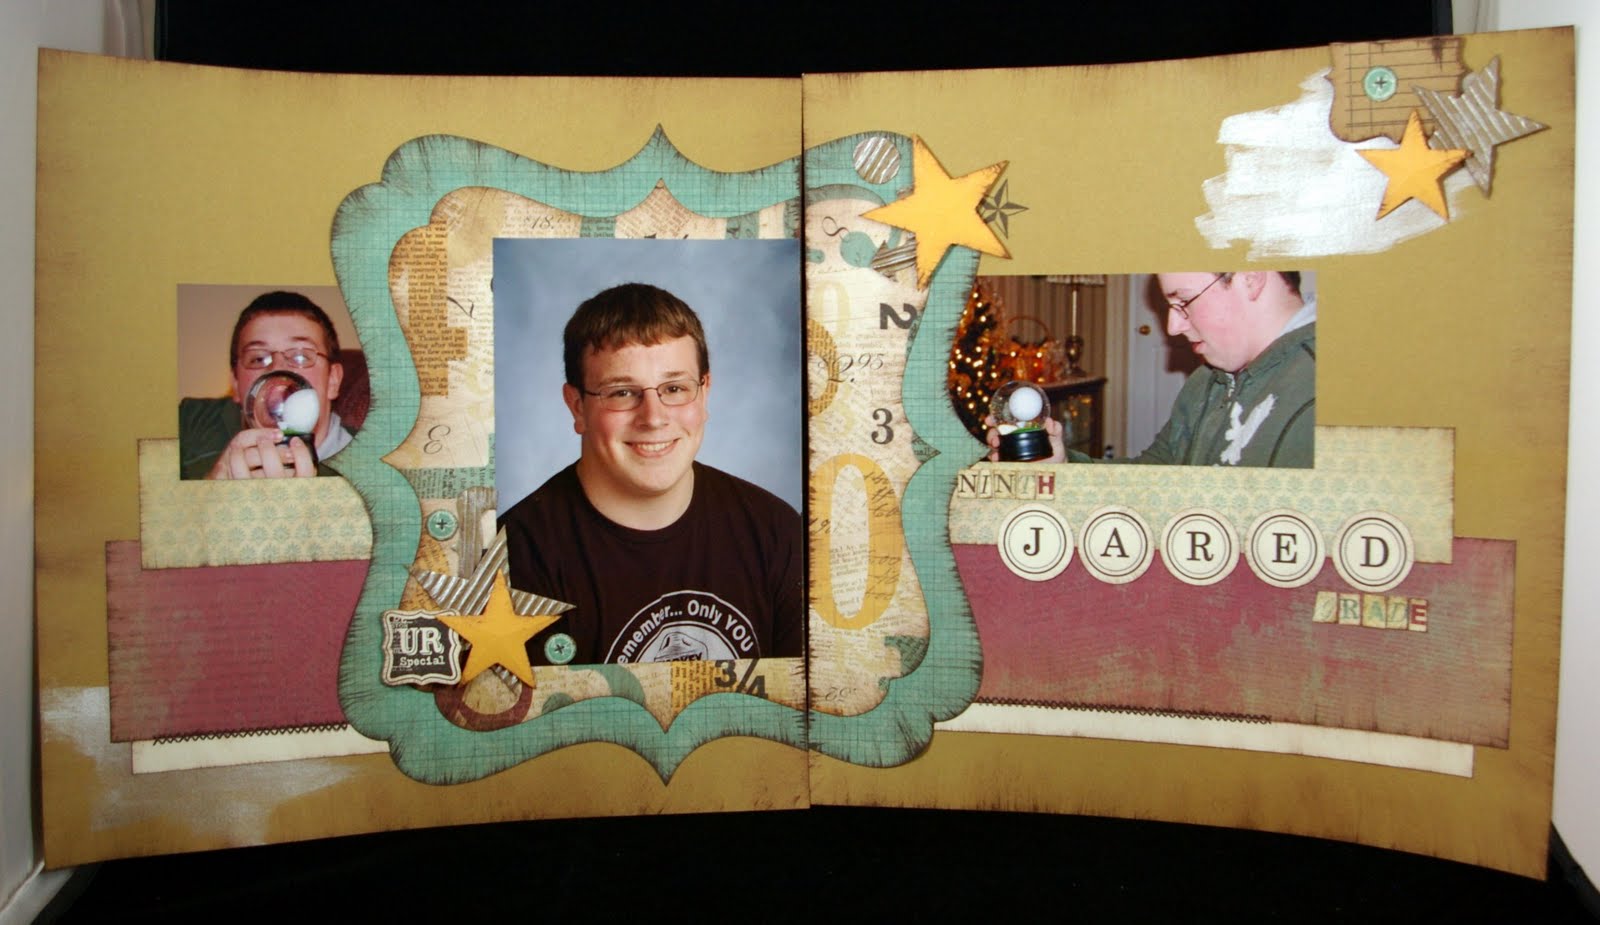
I have really come to love the Workshops on the Go. My time to scrapbook and stamp is pretty limited, so I love that I can pick up the WOTG and get busy! I recently attended a crop at The Keepsake Element, so I just grabbed two WOTGs and was set for the evening. So easy!
With my "baby" in his senior year of high school, I have been focusing on getting his pictures scrapbooked for the graduation open house. Typeset is perfect for school photos! The color combination works for photos of older kids or younger kids. Love, love, love how the pages turned out! The shaped images were cut using the Art Philosophy Cricut cartridge.
The second layout (still searching for just the right pictures):
These darling cards are the alternate project in the Workshop on the Go. I just added a couple of extra items, cut the cards on the Cricut (love that Art Philosophy!), and have these super-cute cards to send to someone special! Do you love the distressing technique? It's so easy to do: Dip the stipple brush into re-inker. Drag the brush from just off the edge of the card inward onto the card.
Feel free to contact me if you'd like to find out how to purchase your own WOTG - or earn it free as a hostess!
Sunday, August 14, 2011
Art Philosophy Images
I knew the Cricut Art Philosophy cartridge would be pretty amazing, but I had no idea how much fun I would actually have with it! There is a lot of variety packed into one awesome cartridge. The photos below will show you exactly how many images you can cut using Art Philosophy. Then multiply it by all the incremental sizes on your Cricut - wow!
Remember, too, that many of the stamp images in the Idea Book coordinate with an Art Philosophy image, making it easier than every to add stamped images to your cards and scrapbook pages. Look for the images outlined in red throughout the Idea Book.
Thursday, August 4, 2011
Cricut fun!
Watch this fun video from CTMH to get some great ideas for using the Art Philosophy cartridge in your scrapbooking and stamping!
Monday, August 1, 2011
August SOTM - Wicked
The August Stamp of the Month, Wicked, is available starting today. I'm not usually a Halloween person, but this stamp set is just so classy and fun that I've had a great time using it. That is a witch with attitude! We've made it even easier to get the D-size Stamp of the Month (available only in the featured month): place an order for $50 or more, and you get the SOTM for $5. You may also purchase the SOTM for full retail price ($17.95). That's it! Couldn't be easier! To make it even sweeter, if you purchase the SOTM for $5, you will get this cute additional stamp set free (Typeface Alphabet)!
Here are a few items made using Wicked. (I love the name - My daughter and I are going to see "Wicked" in a couple of months!)
This cute pillow box and the bracket were cut using the new Cricut® Art Philosophy cartridge. My Cricut hummed and chirped all weekend while I used the new cartridge!
One last card (for now!) - also cut on (guess what) Art Philosophy. The flower was also from Art Philosophy. This makes the popular paper flowers SO easy to make! This card really demonstrates our fantastic new B&T paper. It has a different pattern on each side and is a light cardstock-weight paper.
Subscribe to:
Posts (Atom)